We will guide you through getting your MeArm set up, connected to your Arduino and some basic code on how to get each part moving.
What's in the Box?
- 1x Servo Control Board
- 4x Servos
- 4x Acrylic Sheets with Cutouts
- 4x Rubber Feet
- 2x 16mm Screws
- 15x 10mm Screws
- 16x 6mm Screws
- 1x Allen Key
Please Note: A small Phillips Screwdriver (not included) is required to screw the arms onto the servos, you will also need 6 Male/Female jumper cables to connect the Arduino to the MeArm.
Building Instructions
MeArm has created a brilliant fully-illustrated instructional manual which will guide you step-by-step through the build process of your MeArm. You can find a copy of these instructions here: http://learn.mearm.com/assets/mearm.pdf
The Arduino IDE
Downloading
In order to control your MeArm, you will need to use the Arduino IDE, this is free to download for Windows, Mac OS X and Linux. There is also an online web editor version available which requires an account and further instructions can be found here
Setting up the IDE
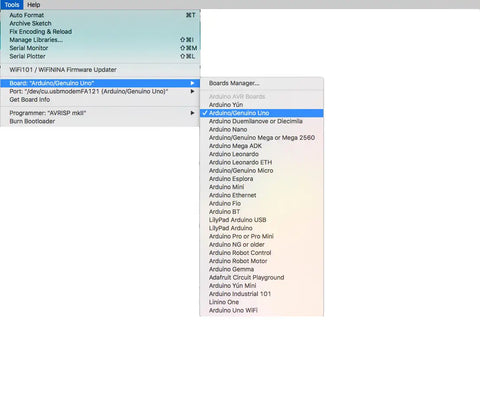
With the Arduino plugged in, open the IDE and select Tools -> Board - > Arduino/Genuino Uno.

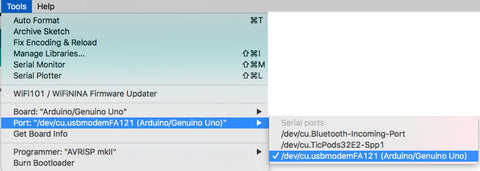
Click back on Tools -> Ports -> Select the option with (Arduino/Genuino Uno)

Connecting the MeArm to your Arduino
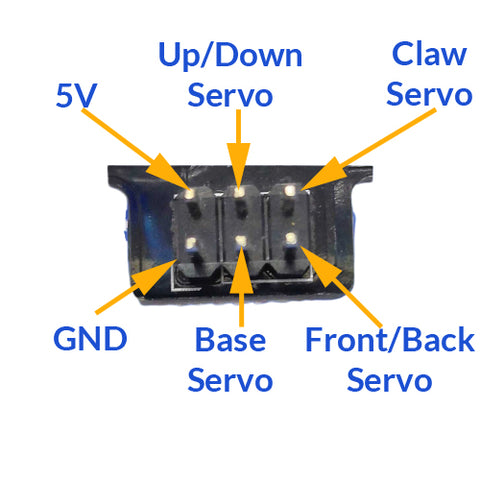
Using Male/Female jumper cables, connect the MeArm to your Arduino by using the image below.

While you can plug them into of the digital I/O pins on the Arduino, for this exercise we have assigned them to the following pins.
| MeArm Servo | Digital Pin |
| Up / Down Arm | 5 |
| Base | 6 |
| Claw | 7 |
| Front / Back Arm | 8 |
Coding the MeArm
Including Libraries
This part allows the program to make use of the servo libraries.#include <Servo.h>Setting Up The Servos
This section of code is used for the setup for the program, servo objects are created with the names base, claw, up_down and front_back. An integer variable is also created with a base value of 0. The setup function is then run which assigns each of the servo objects to one of the digital I/O pins on the Arduino.
Servo base, claw, up_down, front_back;int angle = 0;void setup() {up_down.attach(5);base.attach(6);claw.attach(7);front_back.attach(8);movements();}Making it Move
Creating a custom function
You will need to add a custom function to the program which will be used when the program has finished the startup function.
void movements () {
The code used in these next sections make the individual parts on the MeArm move you need to code them manually. This sounds difficult but is a lot easier than it looks, you will find that the majority of the code that is used is very similar as can be seen in the two examples below.
Example of Closing the Claws
for(angle = 0; angle < 180; angle += 1){claw.write(angle);delay(15);}delay(2500);
Example of Moving Forwards
for(angle = 0; angle < 180; angle += 1){front_back.write(angle);delay(15);}delay(2500);As mentioned before, the code is very similar, the only changes that you need to make in order to distinguish which servo is moving are to change the name of the servo that is being moved, in the examples above we have claw.write and front_back.write. This rule also works on changing the direction that the servos are moving in, as can be seen in the two examples below.
Example of Opening the Claws
for(angle = 180; angle >= 1; angle -= 1){claw.write(angle);delay(15);}delay(2500);
Example of Moving Backwards
for(angle = 180; angle >= 1; angle -= 1){front_back.write(angle);delay(15);}delay(2500);
Breaking Down the Code
For people who are new or not very confident with their programming, we have added this section to teach you what each line of code you have just written does. We have broken it down line by line with an explanation on what each line fo the code does.
Setting up the Servos
Servo base, claw, up_down, front_back;This first line uses the keyword Servo which means that you will be creating 4 Servo objects, the names for each object is defined after this in our example we have used: base, claw, up_down and front_back.
int angle = 0;This second line of code is used to declare the variable to store a numerical value. The first part 'int' means that the variable you are creating is to be of the type integer (whole number) The second part of the code is used to name the variable, in this case, it has been called angle. Lastly, the = 0 is the default value that is assigned to this variable to store, in this case, it is the number 0.
void setup() {This line of code creates a function that runs as soon as the program starts, The void part means that this function does not accept any arguments in order to run. The setup() part defines that this is the first function that should be run and that it should only be run once.
up_down.attach(5);The next few lines of code are very similar and work in the same way. The first section of this code is the servo object you created. The second part 'attach' is used to state that you want to attach the signal to this object to one of the digital pins on the Arduino. The last part of this line is the (5), this is the number of the digital pin on the Arduino that is connected to it.
movements();This line of code is used to call the function called movements.
Making it Move
void movements () {As with the setup earlier, this is a custom function that is run after the setup() has been run.
for(angle = 0; angle < 180; angle += 1)This snippet of code is used to start a loop that will repeat the code inside it until the conditions have been met, we have broken the explanation down into four sperate sections. The first part is the word 'for' this part is used to define what it is going to be a loop and to repeat any code inside the brackets.
The second part angle=0; is the variable that is going to be used in the conditions of the loop, in this example it is our angle variable which we assign the starting value of 0.
The third part angle < 180; is the condition that needs to be met to stop the loop, in this example the loop will keep repeating until the value of the angle variable reaches 180.
Finally, the last part of this loop is angle +=1; this part of the code takes the current value of the variable angle and increases it by 1.
claw.write(angle);The code above is used to move a servo. The first part of the code is the name of the servo which is going to be moving, in this example the servo to move is the claw. The write(angle) part of the code tells the program to write the value of the variable analog to the chosen servo.
delay(15);This line of code means that there is a pause before the program continues onto the next line of code to execute. The number in the brackets is the length of the pause and is represented by milliseconds, this means that if you wanted a pause for 1 second, you would write 1000 in the box. This example is 15 milliseconds, this is around 0.015 seconds, while it is very quick, it does mean that your code will run more smoothly, as it is in the for loop it is run every time the loop restarts.
delay(2500);Like the delay before it, this line of code is another delay and works in the exact same way. The pause for this one is 2500 milliseconds which is the same as 2.5 seconds, as this line of code is outside of the for loop it is only run once the loop has finished which is a great way for adding a small pause between movements of the MeArm.
Example of Working Code
Below is an example of all the code used in this guide put together. This code will extend the MeArm forward, close the claws and bring the MeArm back to its starting position.
#include <Servo.h>Servo base, claw, up_down, front_back;int angle = 0;void setup() {up_down.attach(5);base.attach(6);claw.attach(7);front_back.attach(8);movements();}void movements () {for(angle = 0; angle < 180; angle += 1){front_back.write(angle);delay(15);}delay(2500);for(angle = 0; angle < 180; angle += 1){claw.write(angle);delay(15);}delay(2500);for(angle = 180; angle>=1; angle-=5){front_back.write(angle);delay(15);}delay(2500);}void loop(){}
