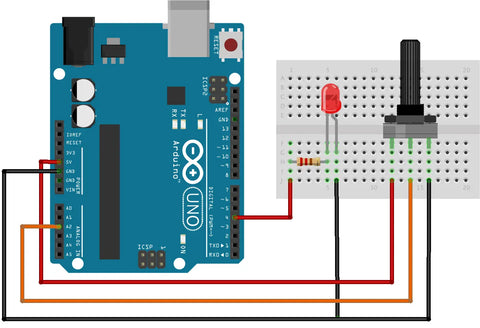
A potentiometer is a great and simple way to create a variable input when using a microcontroller such as an Arduino. This little guide will show you how to connect a potentiometer to an Arduino and some simple code on how to use it as a variable input in a simple circuit. We'll be creating a circuit that flashes an LED where the time interval between flashes is set using the position of the potentiometer.
Hardware Hookup
- Arduino Uno
- Potentiometer
- LED
- Current Limiting Resistor (10K)

Connecting the components together and to the Arduino isn't too complex. We'll be using the potentiometer as an analogue input and the LED as a digital output to act as a visual indicator or the pot position.
When connecting the components make sure to check the polarity of the LED ensuring that the Anode (longer leg) is connected to the positive power via the resistor. The pinout for potentiometers is usually the same (GND, Vout, Vcc) but we'd advise checking the datasheet just in case. You'll need to make a note of which analogue and digital pins you use as we'll need them when we program the Arduino.
Code:
//The following lines define the pins & variables we'll be using
int potPin = 2;
int ledPin = 8;
int val=0;

void setup() {
pinMode (ledPin, OUTPUT);//Sets the LED pin as an output
}

void loop() {
 val = analogRead(potPin); //reads the analogue voltage from the pot via ADC and stores it in the variable
digitalWrite(ledPin, HIGH); //turn the LED output pin high turning the LED on
delay(val); //waits an amount of time dependent on the potentiometer position
digitalWrite(ledPin, LOW);
delay(val);
}
Results
When programmed with this code the speed at which the LED flashes will depend on the position of the potentiometer. If you turn the pot all the way in one direction then the light will flash extremely slowly, and the LED will be constantly on in the other direction. This is because the LED is flashing faster than your eye can process so it appears as constant light.

This code and circuit could possibly be expanded for use in audio and visual systems. It could be used for volume or brightness control, setting contrast, tone control in audio equalizers and so much more!

