How to drive the LEDs
We're now ready to start the fun! But first we need to understand how the LEDs work.
Each of the 8 LEDs is actually 3 LEDs in one package: a red, a green and a blue. Each has 2 connections: the anode (the positive one) and the cathode (the negative). All the red cathodes are connected together and all the green cathodes and all the blue cathodes. All 3 anodes in each package are connected together.
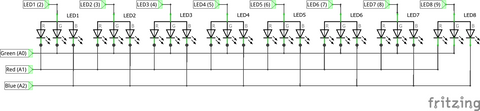
You can activate either the red or the green or the blue cathodes by writing something like digitalWrite(RED, HIGH). You can then activate whichever anodes you like by things like digitalWrite(LED1, HIGH). Only when you've done both will anything light up.
Your new sketch
In your Arduino folder, create a new folder called Pattern1. Copy into it the file Pattern1.ino from the zip file in the introduction.
In the Arduino IDE, click File - Sketchbook. You should see your new sketch Pattern1 which you can open.
Take a look at the function loop(). We saw that this is called repeatedly for ever, but within it are 3 more loops. We can summarise them in "pseudocode" (pretend computer code just to help us understand what's going on) as follows:
Do 20 times:
Do for each colour:
Then there's another set of 3 loops doing something similar, but this time it draws diamonds. Can you see how it does it?
Now over to you! Can you change it to make hollow diamonds?
Continue to Lesson 2 by clicking here!
If you're stuck try reading the Help Sheet!