In this tutorial, we will be guiding you through the 10th experiment in found in the Kitronik Inventors Kit. We will guide you through setting up the circuit and coding the program in JavaScript using the MakeCode software.
Setting Up The Experiment
Parts Needed
For this experiment, you will need the following parts from the kit
- 1 x RGB LED
- 3 x Switch
- 3 x 10kΩ Resistor (brown, black, orange, gold)
- 3 x 47Ω Resistor (yellow, purple, black, gold)
- 3 x M/M Jumper Wire
- 9 x M/F Jumper Wire
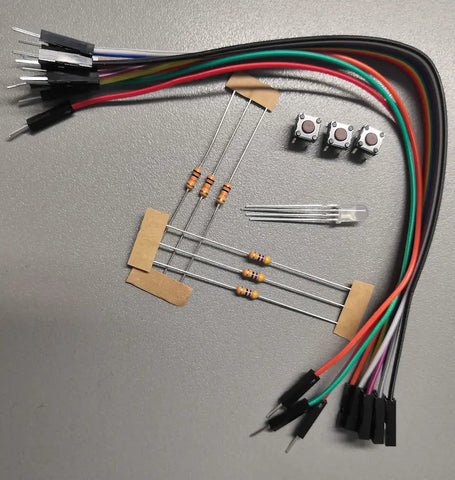
Guide
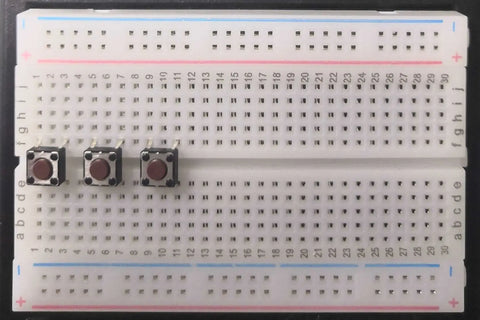
Adding the microswitches
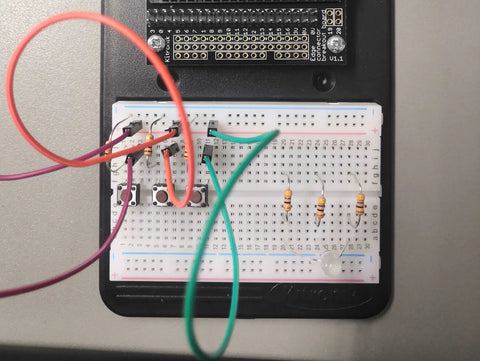
Add the three microswitches to the breadboard at the following locations on the breadboard.
- Microswitch 1: F1, F3, E1, E3
- Microswitch 2: F5, F7, E5, E7
- Microswitch 3: F9, F11, E9, E11
Adding the resistors
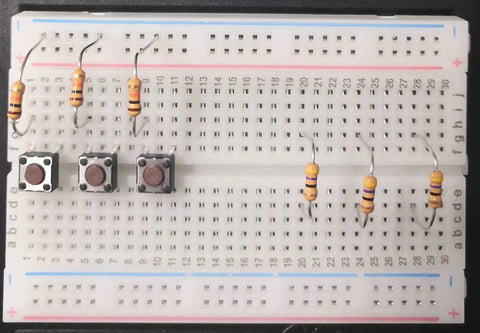
Add the 10kΩ (brown, black, orange, gold) resistors to the following locations on the breadboard
- H1 to - (top row)
- H5 to - (top row)
- H9 to - (top row)
Add the 47Ω resistors (yellow, purple, black, gold) to the following locations on the breadboard
- G20 to D20
- G24 to D24
- G28 to D28
Adding the LED
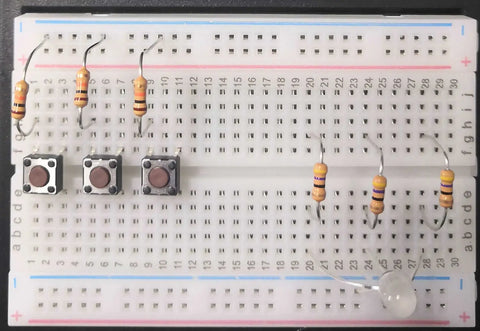
Holding the LED with the flat side facing upwards, the order of the legs are Green, Blue, Common and Red. Insert each leg on the LED to the following locations on the breadboard:
- Red to A20
- Blue to A24
- Green to A28
- Common to - (bottom row)
Adding the M/M Jumper Wires
- J3 to + (top row)
- J7 to + (top row)
- J11 to + (top row)
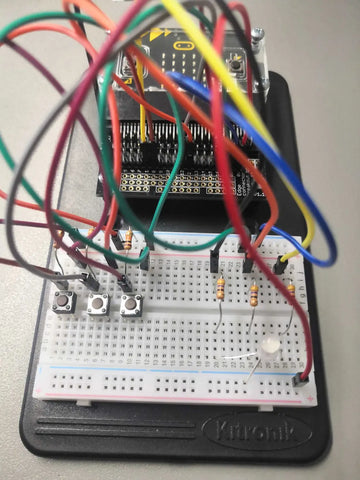
Adding the M/F Jumper Wires
- Pin 0 to J20
- Pin 1 to J28
- Pin 8 to G1
- Pin 12 to G5
- Pin 2 to J24
- Pin 16 to G9
- 3V to + (top row)
- 0V to - (top row)
- 0V to - (bottom row)
Coding the Program
MakeCode Software
Regardless of which OS you are using go to the MakeCode website with any internet browser. The page is broken down into a series of sub-categories with your created projects being at the top along with some premade programs for Tutorials, Games, Radio Games, Fashion and many more!
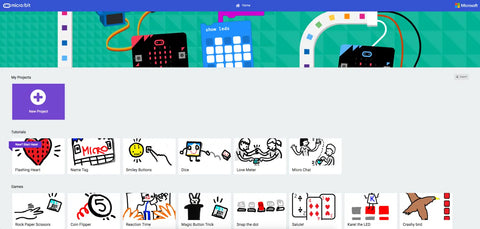
You can click on any of these to load the code, however, if you wish to start your first or a new project click on the big purple box labelled New Project.

You have 2 coding options within this which can be changed by using the At the top of the page you will notice a slider-style button, click on it to change the coding window to JavaScript mode.
 |
 |
|
Block Mode |
JavaScript Mode |
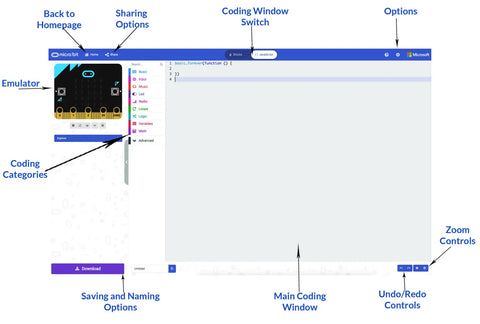
You should now have a screen that looks similar to this.
Coding Guide
Following the code, the first thing that you need to do is declare 3 variables, these will store numerical values between 0 and 1020 to control the brightness of each of the Red, Green and Blue colour levels. On lines 1, 2 and 3 create your variables by writing the following:
let Red = 0let Green = 0
let Blue = 0You will now need code your forever function, this will constantly repeat all the code inside it while the program is running, to make it more manageable, we have broken it down into a number of different steps.
The first thing that you will need to do is create a forever function and the setup for writing to the pins. On lines 4, 5, 6 and 7 type the following:
basic.forever(function () {pins.analogWritePin(AnalogPin.P0, Red)pins.analogWritePin(AnalogPin.P1, Green) pins.analogWritePin(AnalogPin.P2, Blue)
You’re now going to create the first If Statment, this will check that the value at pin 8 is equal to 1 and the value stored in the variable Green is less than 1020. If both conditions are true, it will increase the value of Green by 10, however, if the first condition is true but the value of Green is over 1020 then it will reset the value of Green to 0. To do this, type the following code on lines 8, 9, 10, 11 and 12:
if (pins.digitalReadPin(DigitalPin.P8) == 1 && Green < 1020) { Green = Green + 10
} else if (pins.digitalReadPin(DigitalPin.P8) == 1 && Green == 1020) {
Green = 0}You will now replicate a similar version of the If Statment for the Red variable, this will be written on lines 13, 14, 15, 16 and 17:
if (pins.digitalReadPin(DigitalPin.P12) == 1 && Red < 1020) { Red = Red + 10
} else if (pins.digitalReadPin(DigitalPin.P12) == 1 && Red == 1020) {Red = 0}Lastly, you’ll repeat the same process again, this time for the Blue variable, however, one small change to make is that there is an extra line at the end of this part which closes off the Forever function allowing it to repeat itself once the program is running. On lines 18, 19, 20, 21, 22 and 23 type the following:
if (pins.digitalReadPin(DigitalPin.P16) == 1 && Blue < 1020) { Blue = Blue + 10
} else if (pins.digitalReadPin(DigitalPin.P16) == 1 && Blue == 1020) {Blue = 0}})Uploading your Program to the micro:bit
In the bottom left corner of the MakeCode page, you will find a textbox along with a purple download button. Click on the word untitled in the textbox and give your program a new name.
Press the Download button and the file will download to your downloads folder unless you specified a specific place.

Once the file has downloaded, open up the window for the download location and a separate window for the MICROBIT. Click and drag the file from downloads over to the micro:bit.
Once it has finished, the MICROBIT window will close and reopen, please note that while the file you just copied does not appear in the window, it will have been copied across.

