
In this tutorial we are going to be creating a simple program which will allow us to use our A and B buttons to change the size of a number, once shaken our BBC micro:Bit and display a random number to us. This is a perfect idea if you want to make an electronic dice or pick a random person in a group.
We understand that not everyone is a programmer and some people are only just beginning, so we have tried to keep the technical jargon to a minimum. Whenever we mention something that could be confusing, it will be bookmarked to an explanation at the bottom of the page.
What I will learn in this project?
In this project we will be covering the following:
- Creating variables
- Using user input
- While loops
Parts for this project:
1 x BBC micro:bit
Guide
Step 1: We are going to snap two blocks of code into our ‘on start’ block here, the first block we will snap is ‘show string’ which can be found under the ‘Basic’ tab. The second block of code we will use is ‘set item to 0’. found in the ‘Variable’ tab.

Step 2: Now we have our starting code, we need to edit this code. The first thing we will edit is the string, when we first start our Micro:Bit it is going to say “Hello” to us, this is a little too long so double click on it and change it to “Hi”.
The next thing we need to do is create our own variable, in the variable we added you will see a little arrow next to the word “item” click on this and select ‘Rename Variable’ from the popup menu.

Step 3: You can now type a new name into the popup box that appears, change this to “Players”

Step 4: Currently the variable “Players” is always set to 0 so we need to include a way to increase the amount of numbers we have. In the input tab we are going to add the top option ‘On button press A’

Step 5: We now need to go back to the ‘Variables’ tab, in here we are going to snap the block of code that says ‘change item by 1’ into our new button press block. Remember to click on the arrow next to “item” and change it to “Players”

Step 6: Now that our number changes every time we press the A button we’re going to add a way to see the number of times we press the button. In the ‘Basic’ tab snap the block of code ‘show number’ under our change variable.
We now need to tell our program to show us the variable, to do this we need to go to the ‘Variable’ tab, you will see all our variables at the top, we want the one that says “Players” drag it over the number 0.


Step 7: We now need a way to make the maximum number go down, incase we add too many by mistake or the number we need to use changes. To do this we are going to add a very similar setup like we did for button A with a couple of changes

Congratulations! We are now over half way there, every time we now press the A or B buttons on our Micro:Bit the variable for the number of Players will go up or down by 1.
Now that our program lets us input the number of players, we now need to program the method to display a random number to us. This will look a little tricky once it’s finished but we’ve broken it down into smaller steps to make it easier for you to code.
Step 8: In the ‘Input’ tab we’re going to drag the ‘on shake’ block onto our screen, we will then snap a new ‘set item to 0’ variable to this changing the name of the variable to “RandomNumber” (if you’ve forgotten how to do this, see Step 2)

Notice that when we changed the name, we did not include any spaces, this is called Camel Writing.
Step 9: Click on the ‘Math’ tab and snap the “pick random 0 to 4” to the end of the “set RandomNumber” variable (this is over the 0).
This will now create a random number between 0 and 4, but we need to for the number of times we’ve pressed the button. To do this we need to snap our “Players” variable over the top of the 4.

Step 10: Now when we shake our Micro:Bit it will pick a new random number for us, before we display it we’re going to add a screen to show that it is picking a number.
Go to the ‘Loop’ tab and snap the loop ‘repeat 4 times’ underneath our variable. Change the number in this to 2.

Step 11: Now for the fun part, we can make our Micro:Bit light up with a pattern of our choice. In the ‘Basic’ tab find the ‘show icon’ tab and snap this into your repeat block. If you click on the picture you can then choose from a number of different images
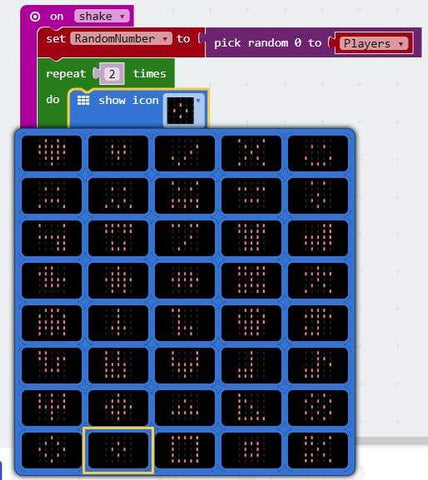
To make it more fun and interesting, you can now add a couple more to these changing the image for each one.

Step 12: We’re nearly done, the final step!! We now need to add the code to show the chosen number, to do this we need to add another ‘show number’ to the bottom of our ‘on shake’ block making sure its outside the loop. (Remember to change the number to our variable, see step 6 if you’ve forgotten how to do this)

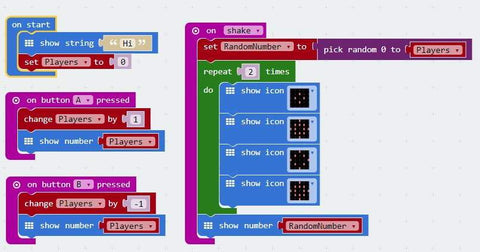
Here a copy of the full code we have written for our program.
Glossary
Block of Code
Block coding is a great way for beginners when first starting to code, they allow beginners to use a visual “block” of code written in plain English to learn the layout and structure of code as you can see what bits of code can “connect” together while the colours are great indicators to separate all the different bits of code.
This example from our program shows the block code we have used and the JavaScript the computer writes.
|
Block Code |
JavaScript |
|
input.onButtonPressed(Button.A, () => { Players += 1 basic.showNumber(Players) }) |
String
A string is a series of individual letters, numbers, spaces or characters, an easy way to imagine a string is to compare it to a sentence.
Variable
A variable is a space made in the computer's memory for us to store, use and change data. In this program we have two variables that store numbers.
Camel Writing
When writing code if we want to name our variables we cannot use spaces as they it will cause errors. To get around this we use what is called “Camel Writing”, this is where we type all the words in our name together without any spaces, instead we capitalise the first letter of each word to show that there should be a space there.
In our program we have a variable for a random number, the best name for this so we know what it is would be Random Number but as we cannot use spaces we write it was RandomNumber.
Loop
A loop is a way to make our program run the same blocks of code over and over again until something makes it stop. This is a great way to help us keep our code tidy as we don’t have to use the same blocks of code over and over again.
In our program the loop which we are using means that it will show all the icons twice before carrying on with the rest of the program.