
The Joystick:Bit V2 is a fantastic gameboard that provides your micro:bit with 4 programmable buttons, a joystick, rumble features, buzzer and power saving options. Create your own handheld games, remotely control Cutebot, create music and more!
In our previous blog we created a simple Micro:Bit Says Game that used the A and B buttons along with the micro:bit's touchpad, in this blog we are looking at adapting the code to create a Micro:Bit Says Game using the controls on the Joystick:Bit.
Getting Started.
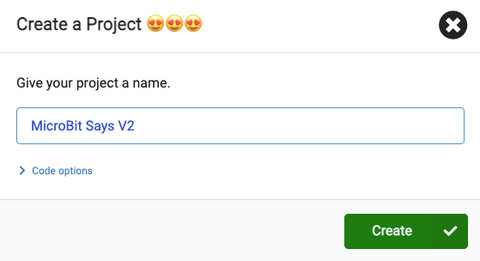
Open your web browser and go to the MakeCode website, click on New Project and name your project Micro:Bit Says V2 then click the green Create button.
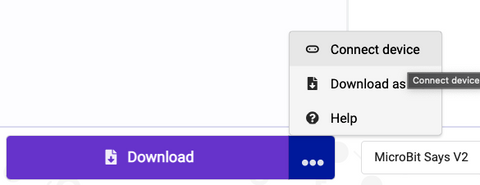
Connect your BBC Micro:Bit V2 to your computer, at the bottom of the screen press the three dots and press "Connect device". Once connected, once the program is finished hit the download button to instantly load it onto the Micro:Bit.
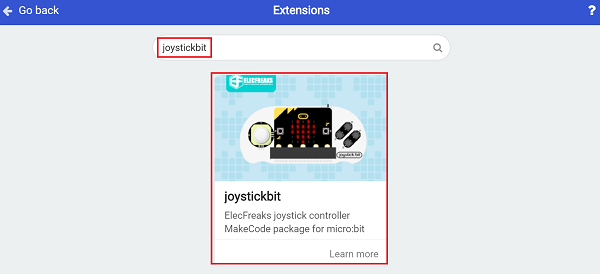
Click on Extensions to bring up a pop-up window, search for "joystickbit" and add it to your program.
Please Note: If you swap between looking at blocks and JavaScript while coding, the MakeCode software will format the code moving them to different lines. This is normal and nothing to worry about, the purpose of us writing the code this way is to make it easier to explain during the tutorial.
Lines 1-3 - Setting up the game
The first three lines of code set the game up by creating a variable called Microbit and gives it a value of 0 to start. It then initialiss the joystickbit allowing it's buttons to be used before finally calling the function GameChoice which we will set up in the next step.
let MicroBit = 0
joystickbit.initJoystickBit()
GameChoice()
Lines 4-15 Creating the GameChoice Function.
The code below creates the GameChoice Function which runs once the game starts and every time the user presses the correct option.
This function sets the MicroBit variable to a random number between 0 and 3. It checks the value assigned to the variable using the If statement, once the number matches the value it's checking it will will display a C, D, E or F on the display.
function GameChoice () {
 MicroBit = randint(0, 3)
 if (MicroBit == 0) {
 basic.showString("C")
 } else if (MicroBit == 1) {
 basic.showString("D")
 } else if (MicroBit == 2) {
 basic.showString("E")
 } else if (MicroBit == 3) {
 basic.showString("F")
 }
}
Lines 16-23 Coding the C button.
The code below runs once the C button is pressed, it first checks to see if the value of the variable MicroBit is 0. If it is true, it makes the Joystick:bit rumble for a second before recalling the function GameChoice.
If it is the wrong button pressed it plays the sound Wawawawaa to indicate an incorrect answer.
joystickbit.onButtonEvent(joystickbit.JoystickBitPin.P12, joystickbit.ButtonType.down, function () {
 if (MicroBit == 0) {
 joystickbit.Vibration_Motor(100)
 GameChoice()
 } else {
 music.startMelody(music.builtInMelody(Melodies.Wawawawaa), MelodyOptions.Once)
 }
})
Lines 24-47 Coding the D, E and F buttons
The code below is similar to when the C button is pressed but works for the D, E and F buttons
joystickbit.onButtonEvent(joystickbit.JoystickBitPin.P13, joystickbit.ButtonType.down, function () {
 if (MicroBit == 1) {
 joystickbit.Vibration_Motor(100)
 GameChoice()
 } else {
 music.startMelody(music.builtInMelody(Melodies.Wawawawaa), MelodyOptions.Once)
 }
})
joystickbit.onButtonEvent(joystickbit.JoystickBitPin.P14, joystickbit.ButtonType.down, function () {
 if (MicroBit == 2) {
 joystickbit.Vibration_Motor(100)
 GameChoice()
 } else {
 music.startMelody(music.builtInMelody(Melodies.Wawawawaa), MelodyOptions.Once)
 }
})
joystickbit.onButtonEvent(joystickbit.JoystickBitPin.P15, joystickbit.ButtonType.down, function () {
 if (MicroBit == 3) {
 joystickbit.Vibration_Motor(100)
 GameChoice()
 } else {
 music.startMelody(music.builtInMelody(Melodies.Wawawawaa), MelodyOptions.Once)
 }
})
Finishing Up
Once you have all of the code added into the Javascript section you can press the purple Download button to transfer it across to your micro:bit and it will be ready to go.
Challenges
Now you have the base game coded, why not try to add the joystick as more options to the game.