There’s a few different ways you could control the servos and in turn control the dog. The main two are creating a long list of individual servo commands or using functions to group certain servo movements/commands.
We’ll be using functions in our examples as we’ve found it makes the programs easier to understand and adapt to other uses.
Main Code Blocks Used:
Function:
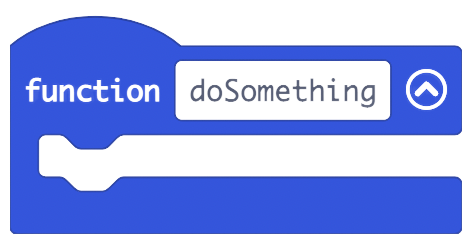
A function lets you create a portion of code that you can reuse in your program. This is handy because you can put code that you want to use over again in a function. Instead of copying the same code to many places in your program, you can just use a function you made and all the code inside is used as a single block.
Servo Control Blocks:
For Motor:bit servo board:

For Kitronik servo board:
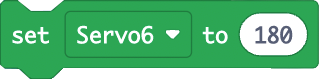
Write a value to the servo on the specified pin and control the shaft. This function will move the shaft of a standard servo to the specified angle, or set the speed of a continuous rotation servo.
These blocks are interchangeable but we’d suggest using the ones specified above for the board you’re using.
Pause:

Pause the program for the number of milliseconds you say. You can use this function to slow your program down.
On button press:
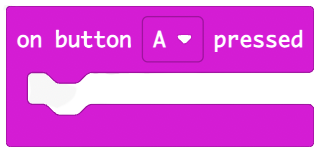
Start an event handler (part of the program that will run when something happens, like when a button is pressed). This handler works when button A or B is pressed, or A and B together.
Lifting Legs Up and Down:
Typical values used to control the servos are 0, 90, and 180. These will need to be adjusted slightly to ensure that the dog stands level and can lift its legs properly. The values will vary depending on the angle you connected the servo horn.
When controlling the servos, we’ll use the one of the servo block mentioned in the previous section. These are simple blocks which allows you to select the pin the servo is connected to and enter a position for the servo to move to.
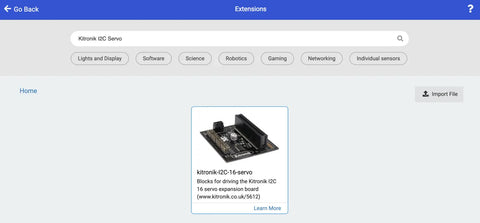
If you’re using the Kitronik Servo Driver you can also use the “set servo” block from the programming extension blocks package for the board. This can be added by clicking Extensions and then searching for “Kitronik Servo” and clicking on the I2C-16-Servo box.
The values for up and down should be the same for both the servos on the left-hand side and also the same value for the two on the right-hand side. The table below has the values that we used in our build but they might be slightly differnet in yours.
For our build the working values were:
These are the generic servo values which are a great starting point. The servo position assignments are with holes on the central mount facing away from you, main body servos closest to you.
|
Servo Name/Position |
Up Value |
Down Value |
|
Back right |
180 |
90 |
|
Back left |
0 |
90 |
|
Front right |
180 |
90 |
|
Front Left |
0 |
90 |
We now also need to do the same for the servos attached to the main body.
|
Servo Name/Position |
Forward Value |
Back Value |
|
Left Middle |
0 (90 middle) |
180 |
|
Right Middle |
90 |
0 |
Checking Your Servo Values:
The example code below uses the A and B buttons to change the servo position. Using and changing the code below we'd suggest going through each of the servos and determing a suitable value for each of the servo positions ndeeded (up, down, forward, backward, etc). You'll need to change the servo in the servo block and also the position values. Use our values from the tables above as a starting point.
| A and B Servo Test: |
Making The Dog Walk:
Now we know how to control our servos and have the servo position values we can make to dog move. There are six steps involved in making the dog move forward:
- Lifting an opposite pair of legs up
- Moving one half of the body
- Lowering the pair of legs
- Lifting the other pair of legs
- Shifting the other half of the body forward
- Lowering the legs
You could create a long section of code blocks that has all the servo control blocks in the order wanted but that wouldn’t be the most the easiest to understand or use. We’ve opted to put all of the servo control inside functions for each step of the walking motion which we can use whenever we want to perform an action. This should make the code easier to understand and easier for you to change and experiment with.
Creating The Code:
Function blocks for each action:
In our example program we’ve created a function for each action involved in walking/turning the dog.
The functions we’ve made are:
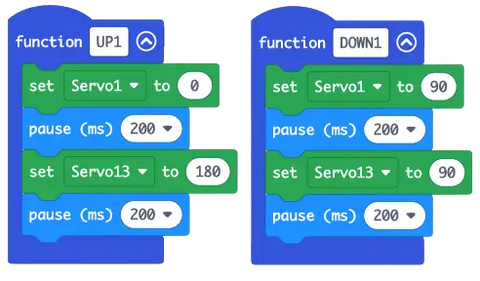
UP1, DOWN1, UP2, DOWN2, FOR1, FOR2, ROT1, ROT2, DEFAULT.
The UP and DOWN functions are for controling the legs in opposire pairs. The FOR and ROT functions are for creating forward movement or rotation using the middle servos. Lastly the DEFAULT function sets all the servos to their "default" positions and returns the dog to it's typical standing pose.
Below if the code used in the UP1 and DOWN1 function. This function corresponds to step 1 and 3 from the list mentioned previously. The code lifts up an opposite pair legs with pauses after each movement to allow for the servos to finish moving and create a pause between each of the steps.
Create order:
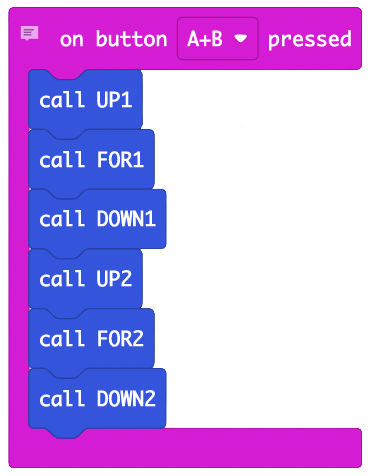
As we have functions created for all the possible movements we’ll need to make the dog walk or turn we just need to put them in the correct order.
Below is the sequesnce of functions we've used to create one cycle of the walking forward motion.
Full Walking Example Code:
Example for Kitronik servo board code:
Making The Dog Turn:
This process is exactly the same as making the dog walk forward. If you replcae the FOR functions with the ROT functions the program will use the other middle servo which causes the parts of the main body to rotate.