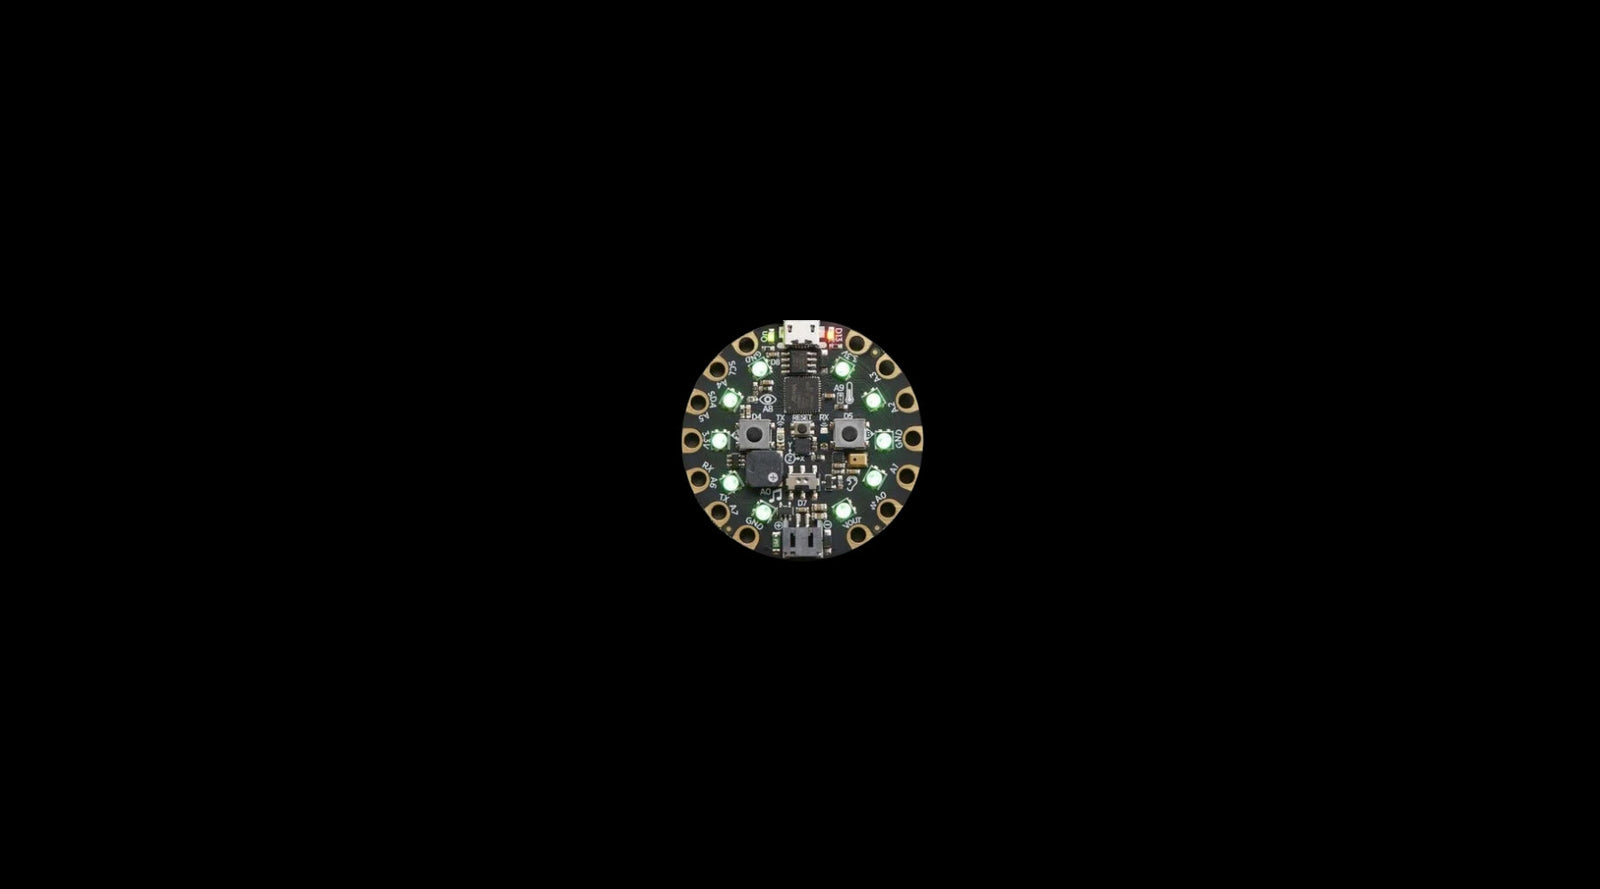
In this tutorial, we will be looking at creating a reaction game with the Circuit Playground Express. This guide will walk you through the program step-by-step and introduce you to using variables and custom functions.
If you are new to programming we would recommend working through our previous tutorial first.
Go to the following website https://makecode.adafruit.com/. Click on the blue box labelled New Project.
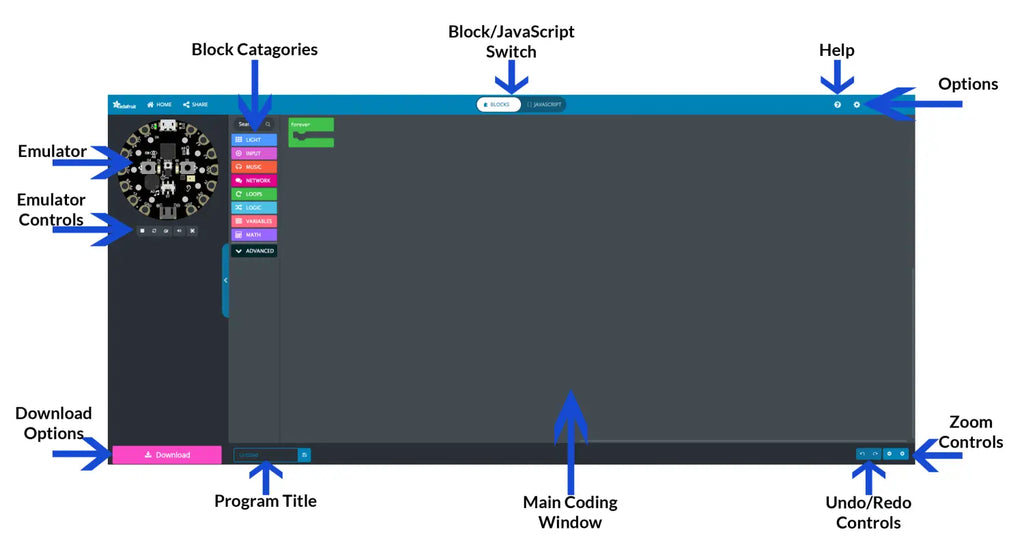
When the window opens up, you will see the following screen, which has been annotated below.
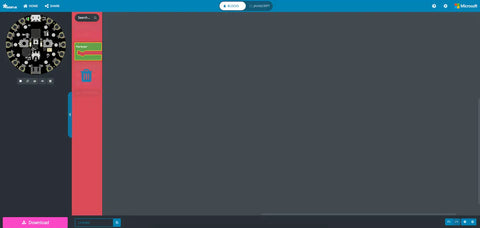
 Click and hold on the forever block and drag it onto the category section, you will see it turn red with a picture of a trash can appearing. When you see this release the mouse button to remove the block from the program.
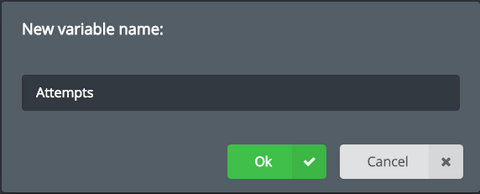
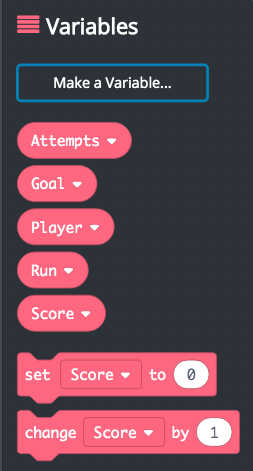
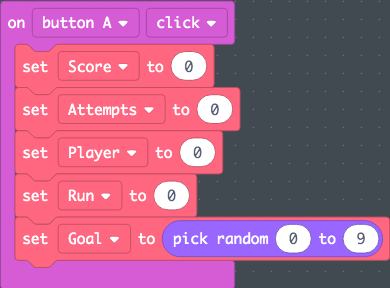
The first thing to do is to create all the variables for the program, click on the VARIABLES category and select the 'Make a Variable' option. In the popup box that appears type Attempts and press the OK button
Repeat this process creating 4 more variables called Goal, Player, Run and Score. If you click on the VARIABLES category, you should see all 5 listed.
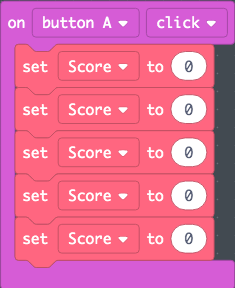
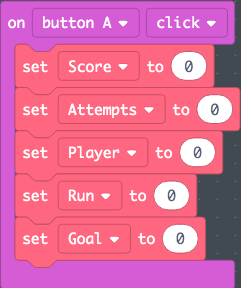
Now the variables are all created, it is time to assign them a value. By default they are set to 0, however, they will need to be reset each time the player starts the game. To do this, you will need to reset them each time the player presses the start button. In this program, it will be coded to the A button.
Click on the INPUT category, click and drag the on button A click block onto the workspace. Click on the VARIABLES category, and drag set Score to 0 block into the input block you just placed 5 times. Click on the little arrow next to the word score changing them to each of the variables.
 |
 |
When the game starts, the goal should pick a random LED which the player needs to stop on. This is achieved by getting the program to pick a random number LED to light up. Click on the MATH category and drag the pick random 0 to 10 block onto the 0 for the variable Goal. As computers start counting at 0, the current random selection is a total of 11 numbers. To fix this, change the number 10 to 9.
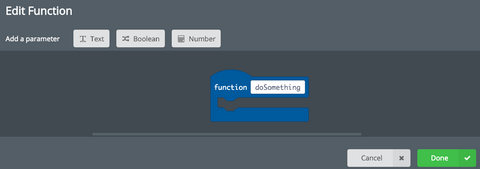
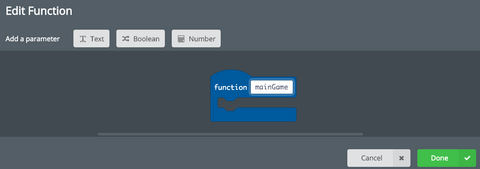
There is one thing left to code on the A button which is the code to start the game playing. Before this can be done you will need to create a custom function for the game code.
Click on the ADVANCED category to open up more options and click on the FUNCTIONS category. This works in the same way as creating a variable, click on the Make a Function option, in the popup box click on the box that says doSomething and type mainGame and press the OK button.
 |
 |
This will add a new block to your workspace, before you add any code into it, click on the FUNCTIONS category and drag the new block call mainGame to the bottom of the code inside the A button.
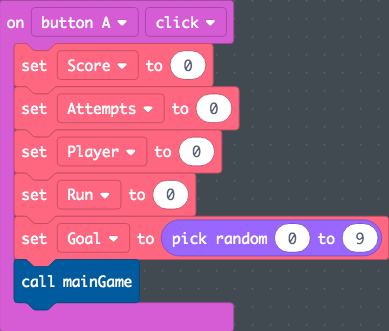
Congratulations! You have now finished coding the A button and the first part of the game, the next part you will code is the mainGame function.
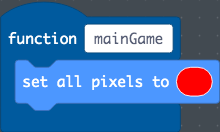
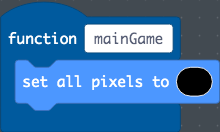
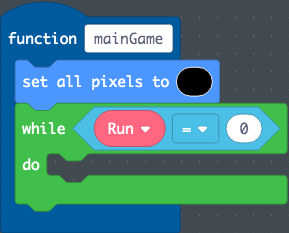
As the game starts you want all the LEDs to turn off, to do this, click on the LIGHT category and drag the set all pixels to block onto the function. Click on the colour red and change it to black.
 |
 |
The next bit of code needs to keep repeating itself while the game is playing, this is achieved by using a while loop. This allows for a condition to be entered which makes the code repeat itself when it is first run.
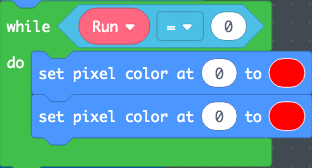
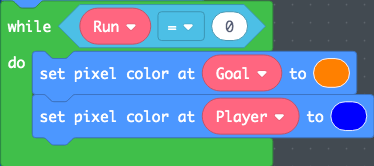
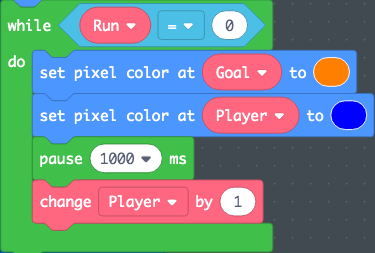
Click on the LOOPS category, drag the while true do block and place it under the set pixels block you just added. This code will run while the variable Run is set to 0, to create this condition in the loop, click on the LOGIC category and drag the 0 = 0 block onto the word true. From the VARIABLES category, drag the Run variable and place it into the lefthand 0.
The rest of the code for this function will all be added inside the while loop. Click on the LIGHT category and drag the set pixel color at 0 to block into the loop twice. From the VARIABLES category, drag the Goal and Player variables onto the 0's click on the red boxes and select a different colour of your choice for each one.
 |
|
You are now going to start coding the players light to move around the screen, from the LOOPS category drag the pause 100 ms block into the while loop, click on the small arrow and change it to 1 second. On the VARIABLES category, drag the change Score by 1 block, changing it to Player.
When the game currently runs, the LED for the player will start to move around the LEDs on the Circuit Playground Express. The problem with this currently is that the LEDs behind it will remain lit, to resolve this you will need to turn off the LED behind the player.
On the LIGHT category, drag the set pixel color at 0 to block into the while loop, from the MATH tab drag the 0 - 0 block onto the pixels 0 space. From the VARIABLES category drag Player onto the left hand 0, change the righthand 0 to -1. Change the colour to black.
 |
 |
 |
 |
Now the light behind the player will turn off as it moves around the LEDs, however, if you run this you will notice that there is a second problem. Currently, the number for the player will keep increasing by 1 meaning that it will light all the LEDs once. You will not add some code to reset the value of the Player variable back to 0 once it has done a full loop of the board.
Click on the LOGIC category, and drag the if true then block into the while loop, again using the LOGIC category, drag the 0 = 0 block onto the darker blue true section. Change the left hand 0 to be the Player variable (found in the VARIABLES category) and the righthand 0 to be 10. Drag the set Score to 0 block into the space of the if statement.

When the variable Player now reaches the number 10, it will be reset to 0. This allows for it to constantly move around the board in a circular motion.
Well Done, that is two parts of the program coded! Just one part more to go!
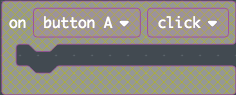
Drag the on button A click from the INPUT category, you will notice that it turns into a grey colour. Don't worry this is just to let you know that there is already an A button input within your program, click on the arrow next to A change it to B and it will turn back to pink.
 |
 |
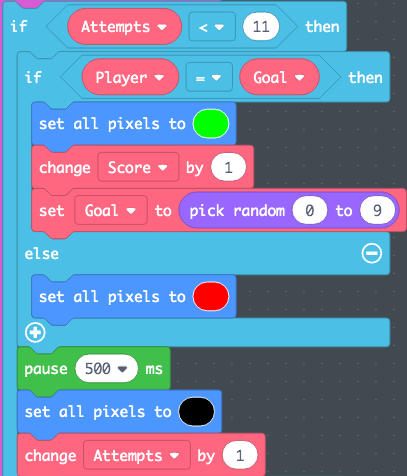
Drag the if true then else block from the LOGIC category into the B button. Using the LOGIC category again, drag the 0 < 0 block over the dark blue true area. Change the left hand 0 to Attempts (found in the VARIABLES category) change the right hand 0 to 11.
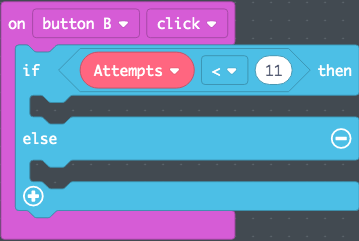
While the number for the variable Attempts is less than 11, the program will run the code you're going to put into the top section of this statement. Once the number of attempts reaches 11, the program will run the code in the bottom part of this if statement.
To make it easier, you will be coding the bottom part of this statement first, drag a set Score to 0 block from the VARIABLES category, change the variable to Run and the number to 1 (this will stop the game running). Drag the set pixel color at 0 to block from the LIGHT category changing the 0 to the score variable and the colour to one of your choice.
CHALLENGE ONE!
Add a while loop under the pixel colour you just added with the condition to loop while the Score is greater than 0. Inside the loop, you will need to light up the LED behind the score value before reducing the value of score by 1.
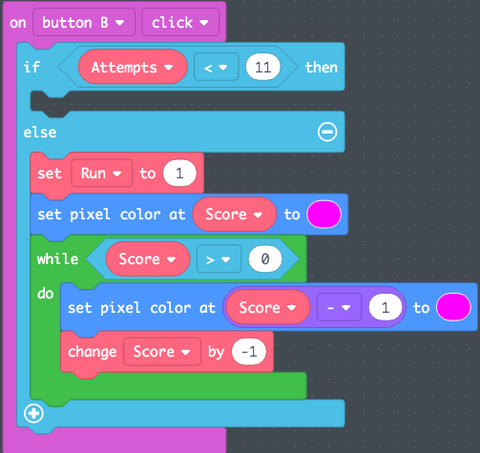
ANSWER ONE
CHALLENGE TWO!
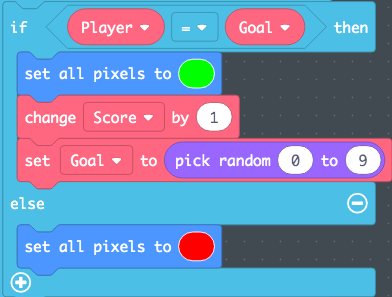
You are now going to create a second if statement inside the top section of the current if statement (this is called an embedded if statement). The new if statement should check to see if the variables Player and Goal have the same value. If they do, it should change all the pixels to green, increase the players' score by 1 and then pick a new random location for the goal. If the two values are different then all the LEDs should turn red.
ANSWER TWO
You're nearly there, only 3 more blocks to add. This one is a bit tricky as they need to be placed in the top section of the first if statement but after the second one. Drag the pause 100 ms block, changing the value to 500, the set all pixels to block changing the colour to black and finally the change Score by 1 changing it to Attempts.
Near the bottom of the screen, you will see a text box with the word Untitled in it. Click in here and rename your program.
Next, click on the pink Download button in the bottom left to start downloading your program.

In order to get your program on the Circuit Playground. Plug a USB cable to your computer. Connect it to your Circuit Playground Express. Press the RESET button to go into programming mode. When the lights turn green, you're ready to click and drag the file you downloaded onto CPLAYBOOT.