
The Lightino Fidget Spinner is one of our most popular items, it's been a massive hit with makers of all ages. One of the great things about the Lightino is that it was designed with STEM education in mind from the very start, it was designed to teach a new generation of programmers in a fun and engaging way. A huge thank you to Phillip Le Riche who created and wrote these lessons for group of four very keen Year 8 (12-13 year old) girls at St George's School Harpenden. They're are having a lot of fun learning how to code using the Lightino. You can find out more about Phillip on his Twitter profile, he's also a contributor on Instructables and iFixit.
Introduction
Lightino is a nifty fidget spinner with eight 3-colour LEDS that you can program to display any patterns you like. You can even make it spell out messages as it spins. It also contains an infrared sensor that allows it to sense the start of each rotation so that you can make the pattern or the message always start in the same place.
Take a look at the spinner. The 3 arms contain the 8 LEDs, a lithium-ion battery and an Arduino. There's an on/off switch between the battery and the Arduino. Slide the tiny knob with your finger nail.
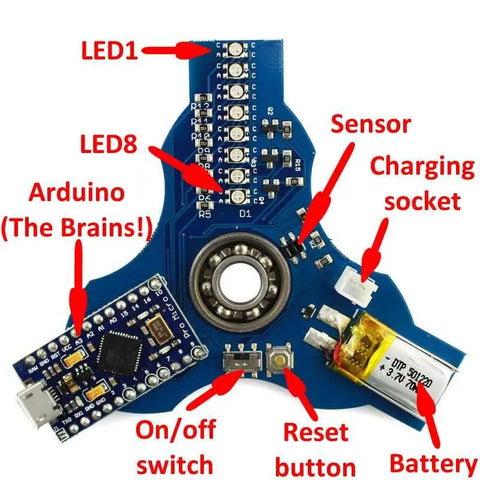
The Arduino is the "brains". You can program it through the micro USB port on the end. To write your program (called a "sketch" in Arduino terms) and upload it you need to run the Arduino IDE (IDE stands for Integrated Development Environment) which runs on a PC. You will be programming in the "C" language. This is very powerful, but even so, it's simple to do simple things. You can find a brief introduction and survival guide in an appendix to this lesson set.
The files you will need are contained in this zip file. Double-click it to launch, then
copy them out when you need them.
Lesson 0: How to program the Lightino
Getting started
If you want to install the IDE on a computer at home you can find the instructions here. On the Arduino IDE Tools menu, select Board: and then Arduino Leonardo. This is important!
Your first program
The first program (or "sketch") anyone ever runs on an Arduino is called Blink. It simply flashes a LED on and off.
Here it is. Type the code below into the Arduino IDE, replacing the skeleton sketch it gives you to start with. (Click File - New from the menu if you need to create a new sketch.) Save it with name Blink.

Understanding it!
The Arduino has a number of programmable input/output pins which in our case are connected to the LEDs. So the first thing in the sketch is to define names for the pins with the #define statements.
Every Arduino sketch has two functions: the first is setup(). This is called once at the beginning and is used to set up things like which pins are to be inputs and which outputs.
The other function is loop() which is then invoked repeatedly for ever.
Launch Windows Explorer (a quick way is to press the Windows key and "E"). In My Documents you should find a folder called Arduino, and in it a folder called Blink. Within that folder is your actual sketch, a file called Blink.ino. Every sketch has its own folder because some sketches consist of more than one file.
Instead of pasting code into a new sketch in the IDE you can create a folder with the name of your sketch in your Arduino folder, then copy the sketch file (with suffix .ino) into that new folder. The IDE will then find it if you click File - Sketchbook.
On the Arduino Sketch menu, select Verify/Compile. This will check your sketch for syntax errors then compile it (i.e. translate it into binary code that the chip understands).
If you don't get any errors, plug the Lightino into a USB port, and on the Sketch menu select Upload (not Upload using Programmer).
It will complete the compilation, then you should see it scanning COM ports for the Lightino. At this point, quickly press the reset button on the Lightino. You should now see it writing the sketch to the Lightino, then reading it back to check, during each of these, displaying # characters to show progress.
Your sketch should now run! Unplug the USB lead and switch on the switch to make it run from its own battery.
Continue to Lesson 1 by clicking here!